Getting started with RenderObjects in Flutter
Understanding flutter widgets in a new way.

I’m Jahswill Essien — a senior mobile engineer, technical writer, and product builder with over 8 years of experience building mobile applications, and 6+ years deeply invested in Flutter.
I don’t just build apps — I build products. From idea to execution, I focus on solving real problems, making intentional technical decisions, and shipping software that scales, performs, and delivers value. My background spans Android (Java/Kotlin), Flutter (Dart), Python for scripting, and an expanding interest in systems and backend technologies like Go and Rust.
Beyond shipping production-grade applications, I’m passionate about knowledge sharing and technical storytelling. I write to teach, simplify, and demystify complex concepts — often using visual explanations, diagrams, and analogies to make ideas stick. This approach has shaped my work as a technical author for platforms like LogRocket and Codemagic, and within the broader Flutter community.
I’m intentional about growth — in skills, in thinking, and in life. I believe great engineers are shaped not just by the code they write, but by how deeply they understand problems, communicate ideas, and collaborate to build meaningful products. If you’re interested in Flutter internals, mobile architecture, performance, developer tooling, or product-focused engineering, you’re in the right place.
You can explore my github page 👉 https://github.com/JasperEssien2
“We are constrained by our minds. What we feel is our limit isn’t our limit. It’s amazing how much we can learn in a short amount of time by perseverance alone.”
One of the many reasons I love flutter is it's flexible yet simple and is a fast means of creating beautiful UI, animations not to mention the number of packages available backed by a wonderful community. It requires minimal effort all we need to do is compose some widgets and boom we perform magic on our codebase. You are likely familiar with StatelessWidget and StatefulWidget which are the two main types of the widgets in flutter. But what if I told you there's another type of widget?

Okay enough of the suspense it's an abstract class of the Widget class called RenderObjectWidget , you don't believe me as to why it's a widget? let's do this go to any subclass of Stateless or Stateful widget, hover to the StatelessWidget reference using your favorite IDE check out the definition, can you see it extend the Widget class? Now search for RenderObjectWidget check out what it extends and see for yourself.

Cool right? are you just hearing about this? I just got deeper into render objects a few days ago so no worries.
So let's get started. There are three trees (do you mean trees three? okay that's dry let's move on) in flutter. Widget, Element and RenderObject tree.
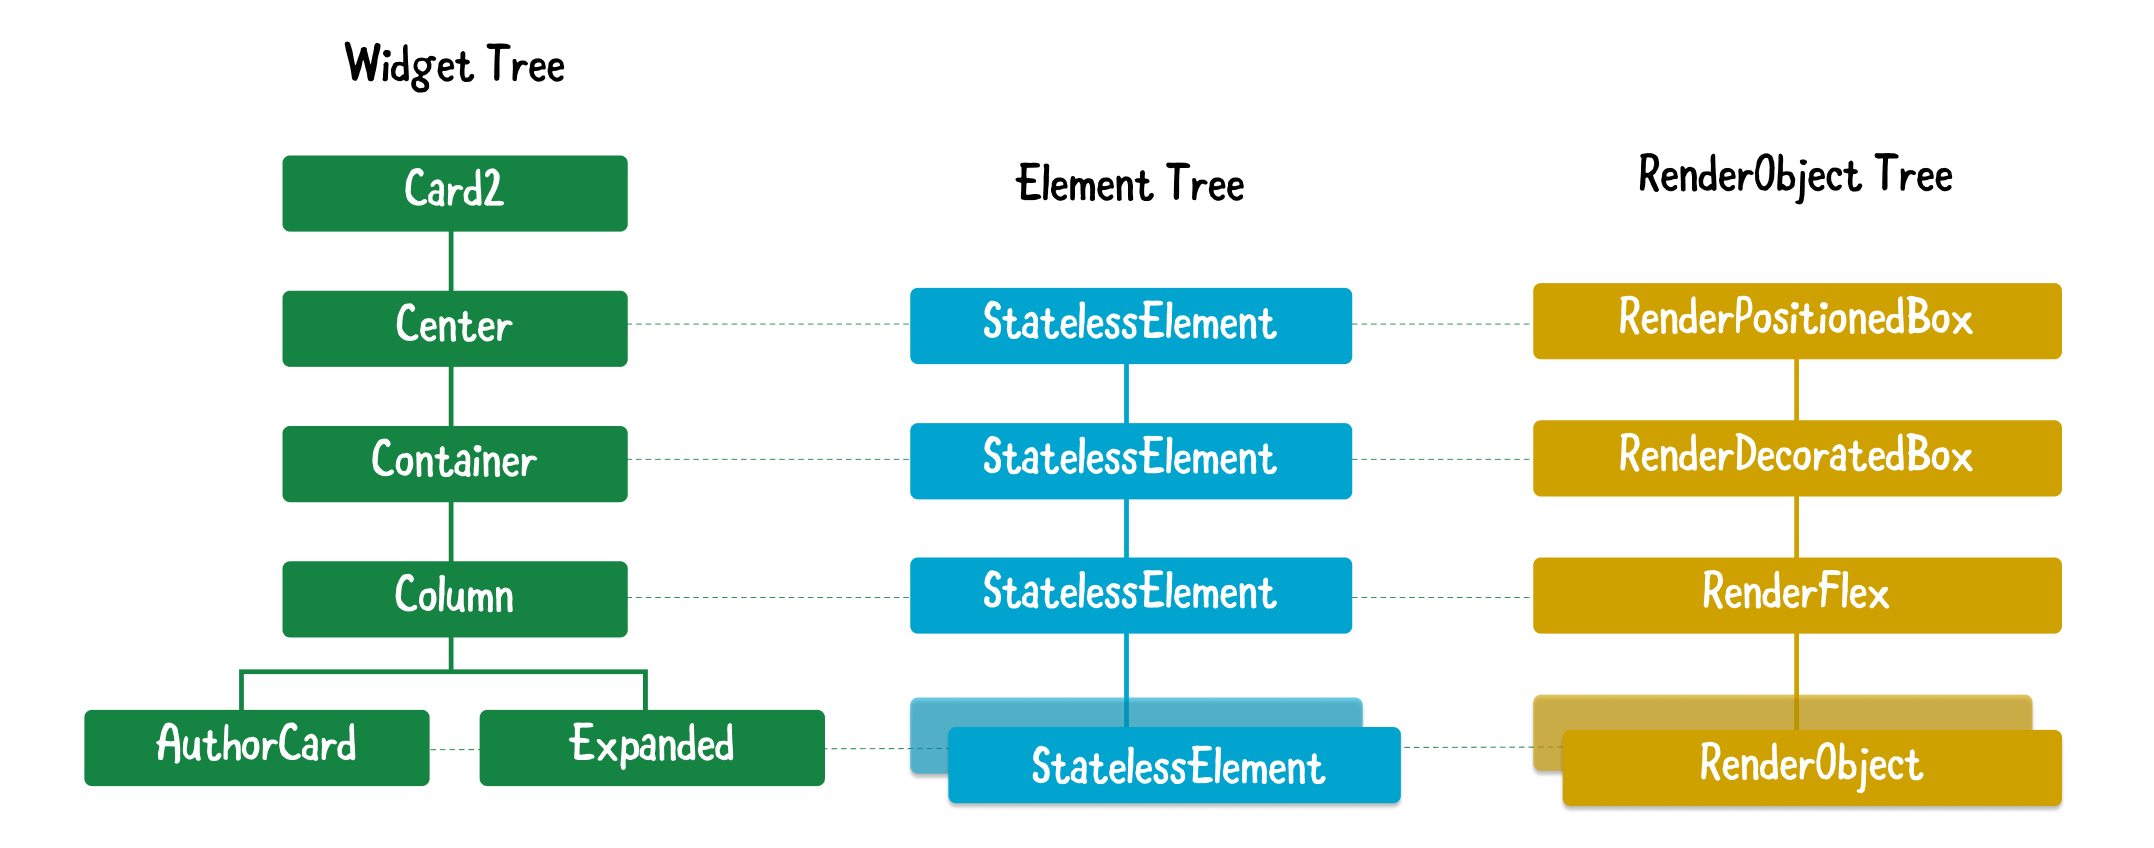
A pictorial display of the three trees in flutter, gotten from https://www.raywenderlich.com/books/flutter-apprentice/v1.0.ea2/chapters/4-understanding-widgets
Widget tree is basically for configuration, meaning you configure how parts of the app look like. This acts as a connection/configuration for the underlying imperative RenderObject.
Element tree: Manages the lifecycle and states while keeping a record of the position of the widget in the tree.
RenderObject tree: Interestingly this is what brings UI to the screen it also handles positioning and painting, hit-testing, and accessibility of widgets you create. All Widgets you use contain a RenderObject.
RenderObjectWidget is a kind of abstraction of the Widget that contains a default implementation of an Element and allows creating a RenderObject on the widget layer. Traditionally, it goes Widget -> Element -> RenderObject. This widget like the stateful widget allows you to skip the Element creation step. There are three major RenderObjectWidget which are:
- Leaf Render Object Widget : This is to render widgets that has zero child.
- Single Child Render Object Widget : As the name implies, this can only render a single widget.
- Multi Child Render Object Widget : This is used to render multiple children widgets.
Everything is a widget in flutter, but then it's also true everything you see on screen is a RenderObject (why do I sense RenderObject pulling strings from behind scene like Black Zetsu in Naruto anime).
Time to dive into codes, oh wait, there's one more concept we need to talk about before diving into code, just one I promise. We need to understand RenderBox protocols. Dude that's new, where did RenderBox come from, well RenderBox is just a subclass of the RenderObject with a focus on the box protocol. Which can be described by a box-like constraint with min/max width and height. RenderBox protocols are:
- Constraint goes down.
- Sizes go up.
- Parent set position
Intuition
If you're like me that loves traveling; let's imagine we are preparing for a super cool trip before embarking on this journey we have to set up our traveling bags, the size of our bag is 100x50px, it's a short trip we just have 3 clothes to fit in. A red shirt folded to size 50x50px, a blue shirt folded to size 50x25px, and lastly a purple shirt folded to size 50x25px.
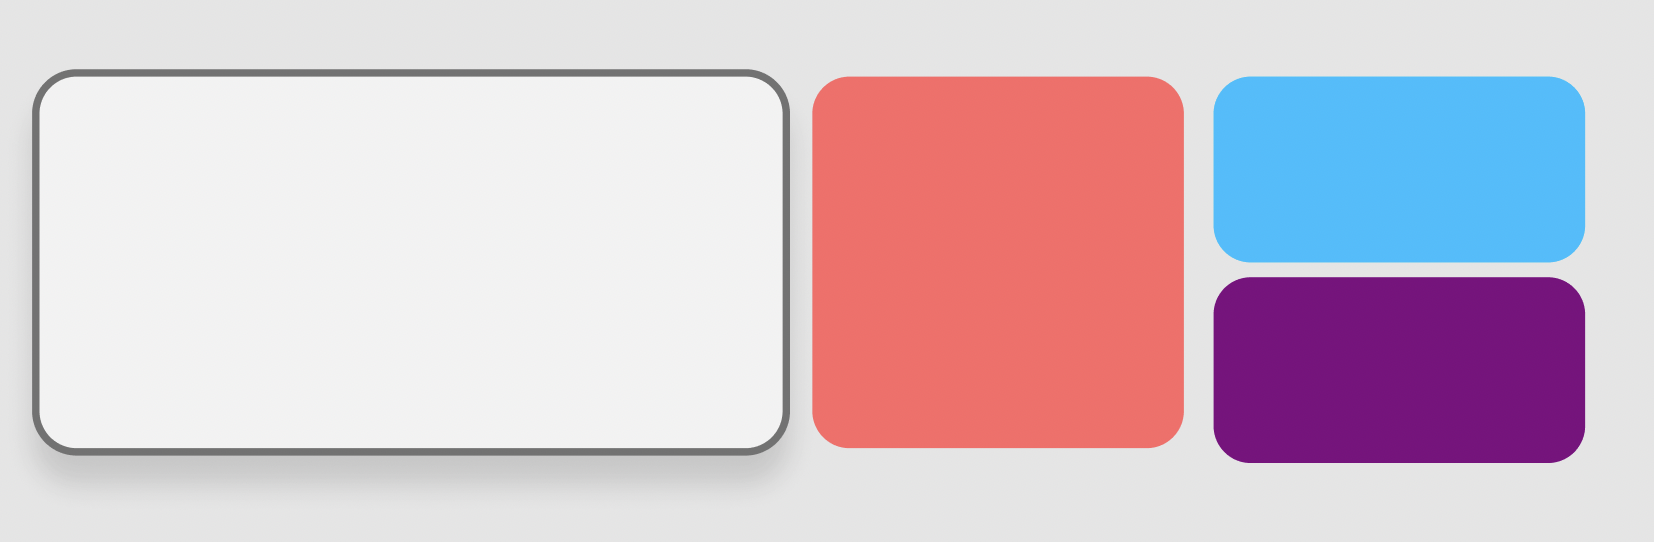
Our traveling bag (100x50px), our red shirt (50x50px), our blue and purple shirt (50x25px)
Time to start packing, the conversation between the Parent widget and child widgets goes this way:
Red Shirt: Put me first!!
You: Okay then, I'll put you in but you can occupy not more than 100x50 px space as that's my limit.
Red Shirt: That's fine, I'm folded to a size of 50x50px.
You: Great, I'll position you center-left then.
Blue shirt: I guess I'm next then, yeah?
You: Yeap, but then the red shirt is occupying 50x50, so you can only occupy a size, not more than 50x50.
Blue shirt: Do you have dementia? you folded me to size 50x25 so that's sufficient.
You: Yeah, I did fold you to that size I'll position you to top right then.
Purple shirt: …
You: I know I know you're of size 50x25, I just have 50x25 space left so you'll fit right in, come on board.
Here's the breakdown, parents tell children their constraint (down), children tell their parents their size (up), and then parents set children's position.
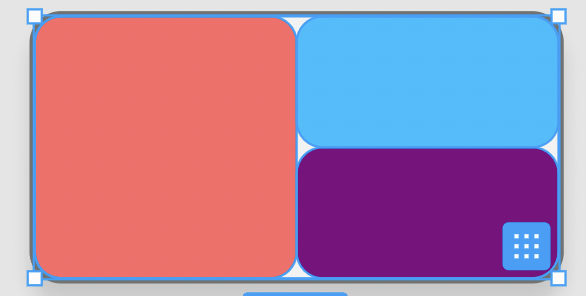
Our traveling bag with our clothes packed in
For a more comprehensive explanation with lots of code examples, visit the flutter documentation here.
Time to code
Let's implement our traveling bag widget. Here's how it works: we pass in a list of shirts to the TravelingBagWidget it automatically position and resize shirts to their correct size to fill the Travelling bag. Passing in one shirt fills the whole space available, two shirts place them side by side equally, three shirts position first two shirts to the left then size them equally proceed to position the last shirt to the right to fill the space left. The end goal is to design something close to the above image.
To begin with the code we'll have to subclass a LeafRenderObjectWidget for the shirt widget, and MultiChildRenderObjectWidget for the traveling bag widget. But first, let's design our ShirtWidget.
Implementation of ShirtWidget
Let's create our ShirtWidget by extending LeafRenderObjectWidget (If you prefer reading full code first before explanation you can go look at the code then come back for explanation). Here we define a color since we can have different color shirts.
class ShirtWidget extends LeafRenderObjectWidget {

   const ShirtWidget({Key? key, required this.color})
            : super(key: key);

  final Color color;
}
A thing to note when subclassing any RenderObjectWidget is that the method createRenderObject() needs to be implemented, it's responsible for instantiation of your render object while passing any attributes your render object needs; For dynamic properties, updateRenderObject() need to be implemented as the propagation of these changes to RenderObject is handled here.
@override
RenderObject createRenderObject(BuildContext context) {
    return _ShirtRenderBox(color: color);
}
@override
void updateRenderObject(BuildContext context, covariant _ShirtRenderBox renderObject) {
     //Here we are updating the renderObject color, more on that
     renderObject.color = color;
}
Implementation of ShirtRenderBox
To implement the ShirtRenderBox we extend RenderBox. We create a getter and setter (To optimize our code, we add some checks before propagating changes) given that our color property is bound to change (more on this soon).
class _ShirtRenderBox extends RenderBox {
   _ShirtRenderBox({required Color color}) : _color = color;

   Color _color;

   Color get color => _color;

   set color(Color value) {
      if (value == color) return;

      _color = color;

      markNeedsPaint(); //more on this soon
   }
}
Demystifying _ShirtRenderBox
These are the methods and an explanation of their purpose:
computeDryLayout()This is where we write in code that computes the size of the widget based on the parent constraint keeping in mind that constraints go down, size goes up. In our case we want the size to be set by the parent but by default, it should occupy the maximum constraints provided by the parent so we set width and height to max constraint.paint(PaintingContext context, Offset offset)is where you handle the painting of the widgets. In this case, we draw a rect with a specific size, then proceed to position (offset & sizeis same as doingRect.fromLTWH()), we then pass aPaintinstance and then set the color.set color(Color color){}this setter will be used to update the color, this is used in theupdateRenderObject()of ourShirtWidget. For efficiency sake, we check if the new color differs from the color previously set, if it does we go ahead and callmarkNeedsPaint(),markNeedsPaint()is called to notify the widget tree of a change in visual appearance that it needs to be repainted.
Full code of our custom shirst widget
That was a lot to process, i hope it at least it gave you an intuition of how to implement a LeafRenderObject. Next we look at how to implement MultiChildRenderObjectWidget.
Implementation of TravelingBagWidget
Now it's time to implement our traveling bag widget. The same intuition we got implementing the ShirtWidget applies to the TravelingBagWidget with some differences like: subclassing MultiChildRenderObjectWidget instead, passing a list of children, position these children by our self using Offset based on constraint given by parent widget.
Let's get started. we'll start by subclassing the MultiChildRenderObjectWidget and overriding necessary methods, nothing much to be done here.
class TravelingBagWidget extends MultiChildRenderObjectWidget {

TravelingBagWidget({
      Key? key,
      List<ShirtWidget> children = const [],
    }) : super(key: key, children: children);

@override
    RenderObject createRenderObject(BuildContext context)  => _TravelingBagRenderObject();

@override
    void updateRenderObject(BuildContext context, covariant  _TravelingBagRenderObject renderObject){}
}
Let's jump into creating our TravelingBagRenderObject.
Have you ever thought of how Flexible widgets or Expanded in Columns, Rows works, i mean it works as expected when i use them, why should i worry about that? Well you shouldn't but here's how it works,
Columnunder the hood is a subclass ofFlex, which has arenderObjectofRenderFlex. A subclass ofParentDatacalledFlexParentDatais created, andRenderFlexactually implements a generic mixin of whichFlexParentDatais passed. I know this is somewhat confusing but just bear with me hopefully it will make sense.Flexiblewidget under the hood extends a genericParentDataWidget<FlexParentData>,FlexParentDatahas aflexand afitattribute. So what's the take? Assuming 3 children widgets;Flexible(flex:1),Flexible(flex:2),Container()is passed toColumn()when it's time to layout children,Columnrender object (RenderFlex) is able to access the child's flex through theFlexParentDatause that info to set constraint in relation to other children, so flex of 2 takes up larger size, flex of 1 takes half the size of flex 2 then container takes the space left. Phew!!, that was a lot, take a peep at official document here, to learn more on this.
So let's create our ParentData subclass. We aren't going to do anything with flex to keep things simple. But hopefully you'll get an intuition of implementing that.
class TravelingBagParentData extends ContainerBoxParentData<RenderBox> {
   /// if we are to implement flex, we'll set it here like
   /// int flex;
}
Let's implement our _TravelingBagRenderObject , we start by subclassing RenderBox and implementing these generic mixins ContainerRenderObjectMixin<RenderBox, TravelingBagParentData> and RenderBoxContainerDefaultsMixin<RenderBox, TravelingBagParentData>, to implement render object with list of children these mixins are important as it implements a lot of useful methods for you.
class _TravelingBagRenderObject extends RenderBox withContainerRenderObjectMixin<RenderBox, TravelingBagParentData>, RenderBoxContainerDefaultsMixin<RenderBox, TravelingBagParentData> {

   @override
   void setupParentData(covariant RenderObject child) {
    if (child.parentData is! TravelingBagParentData) {
       child.parentData = TravelingBagParentData();
   }
  }

   @override
    Size computeDryLayout(BoxConstraints constraints) {
      return Size(constraints.maxWidth, constraints.maxHeight);
    }
}
Here we implemented the setupParentData() we check if parentData of the child is set if it's not we set it to TravelingBagParentData(). We've seen how computeDryLayout() works, something to note is that if this widget size depends on it's children's size, computeDryLayout() is where you perform computations to calculate the total size of the children and then return the size.
Next we implement performLayout() we get the size of the render box by calling getDryLayout() not to be confused with computeDryLayout() as computeDryLayout() is what you implement.
Next we loop through the children, but this time position them using offsets. The method loopThroughChildren() is a helper method we create to help with looping so we don't duplicate or code, it accepts a callback function that is called for each iteration. The algorithm for positioning our shirts children is:
- Get child
- Get left column count
- Get right column count
- While child not null and left column count to layout greater than zero
- Calculate offset for left children (offset will be dx=0 and dy = child height+ previous dy) and set it on the child parent data offset.
- While child not null and left column count to render is lesser or equal zero
- Calculate offset for right children (offset will be dx = child width, dy = child height + previous dy) and set it on the child parent data offset.
- Set child to next sibling
Next we override paint() we defer painting to children by calling defaultPaint() .
Here's the full code
To learn more about render objects the flutter document there's also this cool video that explains all you need to know about Render Object https://www.youtube.com/watch?v=HqXNGawzSbY&t=7517s.
When to use RenderObject
Most of the time you wouldn't have to implement your own RenderBox. Of course implementing our own render box for the traveling bag is overkill as we can do that with widgets provided in flutter, You should think of implementing your own render box when:
- Building complex widgets.
- You need more control over building of widgets.
- It's also great to have a good understanding of how flutter widgets are built.
This article was meant to be a guide to understanding render objects and does not cover everything about render objects. The goal is to give you an intuition of what Render Object is while giving you the avenue to play around with it.
Let me know what you think in the comment section, correction, tips or ideas. I always appreciate feedbacks as it helps me improve. Thanks for reading.


