


How to implement GraphQL with Flutter + GraphQL example + CI/CD (Codemagic)


Originally posted in Codemagic
Have you ever been faced with the task of implementing restful API's in your mobile application and you find yourself calling multiple endpoints to populate data for a single screen? You probably wished to have more control over the data returned by the endpoint, it could be to have more data fetched with a single endpoint call or have only the necessary data fields returned by the call.
Follow me along to see how to achieve that with GraphQL. In this article, you'll be tasked with implementing GraphQL in an existing codebase. We will discuss what graphql is, why we chose graphql, how to implement graphql with flutter, and implement continuous integration/delivery in our completed app.
This article assumes familiarity with the flutter framework and experience with using REST APIs.
The project we'll be working on is named Music Mates, its functionality is a very simple one.
- Users are asked to select favorite music artists from a predefined list during sign-up.
- Users should see fellow users that share one or more favorite music artists.
- Users should see a list of their selected favorite artists.
Below is the final result of the application.
Set up
Run this command to clone the project from Github to your local, git clone -b widget_design https://github.com/JasperEssien2/music_mates_app.
Next, we need to have a proper understanding of the codebase, let's walk through the codebase together. Below is the folder structure of the application.
lib/
|- core
|  |_ constants.dart
|  |_ maths_mixins.dart
|
|- data
|  |- model
|  |  |_ artist.dart
|  |  |_ user_model.dart
|  |  |_ home_model.dart
|  |
|  |_ queries.dart
|  |_ data_export.dart
|
|- presentation
|  |- widgets
|  |  |_ error_widget.dart
|  |  |_ google_button.dart
|  |  |_ item_artist.dart
|  |  |_ item_mate.dart
|  |  |_ item_select_artist.dart
|  |  |_ loading_spinner.dart
|  |  |_ mates_ring.dart
|  |  |_ export.dart
|  |
|  |_ get_started_screen.dart
|  |_ home.dart
|  |_ select_favourite_artist.dart
|  |_ presentation_export.dart
|
|_ main.dart
Folder structure of the application.
Utility classes used in the codebase are contained in the core folder. The constants.dart file contains defined spacing widgets to use for padding between widgets.
For adaptability of the ring widget that displays a user's music mates, we will be needing some math functions and that’s defined in the maths_mixin.dart. Below is the code snippet for MathsMixin.
mixin MathsMixin {

 /// This method computes the radius of each individual circles in relation
 /// in relation to the number of circles required and the radius of the large circle
 /// this helps the circles in the ring to be adaptable, regardless of the number of circles
  double radiusOfSmallCicleInRelationToLargeCircle(
          double largeRad, int numberOfCircles) =>
      largeRad * math.sin(math.pi / numberOfCircles);

  /// Gets the exterior angle of one small circle
  double unitAngle(int numberOfPoints) => 360 / numberOfPoints;
}

extension MathsHelper on num {
  /// converts a degree value to radian value
  double get radian => this * math.pi / 180;
}
The data folder contains our model classes and queries.dart file. The queries.dart contains queries string document, more on this soon.
The presentation folder contains all our widgets. The MatesRingWidget widget in the mates_ring.dart file is an interesting one. It's the widget that displays a user's music mates in a ring pattern. I've added some helpful comments explaining how that was achieved. Feel free to check out that file.
These are the dependencies added at this time
flutter_svg- Used to display .svg filegoogle_sign_in- To implement google sign in
We now have an overview of the current codebase, our task would be to implement GraphQl in this application, but what is GraphQl?.
What is GraphQL?
GraphQL is a query language that serves as a contract between the server and the client. It uses its own defined schema, Schema Definition Language (SDL), which was developed by Facebook.
A schema can be thought of as a blueprint that describes the way data is organized. It’s worth noting that GraphQL is not a database technology, rather it's just a language that specifies what data is needed, it then sends the request from the client to the backend for resolving the query.
Why GraphQL?
Graphql has several advantages over traditional REST API. This section covers why we chose this technology for this project.
Use of Single Endpoint
One of the advantages graphql has is the use of a single endpoint as opposed to different endpoints to fetch various data. For comparison purposes, when dealing with music mates, using REST APIs can have about 5 different endpoints in total:
baseUrl/create-user>baseUrl/all-artists>baseUrl/users/<id>>baseUrl/users/<id>/favourite-artists>baseUrl/users/<id>/music-mates
On the other hand, when using graphql we need just a single endpoint, say baseUrl/graphql. Weird isn't it? The question you'd probably be asking is, how does graphql know what data to return?
Well, rather than endpoints graphql organizes data in terms of types and its fields or properties in other to make sure clients ask for only what is possible. The fields can be a scalar (Int, Float, Boolean, String) or objects that contains properties of their own. An example of a graphql schema is below.
type Artist{
  id: ID!
  name: String!
  imageUrl: String
  description: String!
}

type User{
  id: ID!
  name: String!
  googleId: String!
  imageUrl: String
  favouriteArtists: [Artist!]
}
Above, we specify the type of schema, the field, and datatype of the field, the ! sign specifies that the field isn't nullable. A list datatype is specified by using square brackets [] and the list content datatype.
Fixes the issue of under-fetching/over-fetching
Fixing under/over fetching is one of the greatest strengths of graphql technology. To understand these concepts, take a look at the screen below, what data is needed to populate the screen?
Dealing with under-fetching of data
For this screen, user's info, user's favorite artists and user's music mates data is needed to populate this screen, right? Using REST APIs we will have to call an endpoint to fetch the user's info, another endpoint to fetch favorite artists, and another to fetch the user's music mates. This can be referred to as under-fetching, this is because a call for data does not return sufficient data needed at that point of request.
On the other hand, using graphql, we can specify all the data needed at once, look at the query below (For now, don't worry about trying to understand what's going on, this will be explained in detail later on).
 query UserInfo(\$googleId: String!){

    userInfo(googleId: \$googleId){
      id
      googleId
      name
      imageUrl
      favouriteArtists {
        id
        name
        imageUrl
        description
      }
    }

    musicMates(googleId: \$googleId){
      id
      googleId
      name
      imageUrl
    }
  }
You can retrieve all the data including nested data (as shown in the userInfo block querying favouriteArtists) with just one call. Isn't that beautiful? That's the power of graphql.
Dealing with over-fetching of data
Take a look at our home screen again, the circle avatar widgets for displaying the user's image, we just need only the user's image property from the data. For the artist item, we need just the artist’s name, image, and description properties.
With REST APIs we have no control over what field should be returned, it just returns the whole data properties specified by the endpoint, this is termed as over-fetching, fetching data properties that aren’t needed.
Using graphql, we have control over what field should be returned by the API. Refactoring the above query to suit our current widgets need, we have:
 query UserInfo(\$googleId: String!){

    userInfo(googleId: \$googleId){
      imageUrl
      favouriteArtists {
        name
        imageUrl
        description
      }
    }

    musicMates(googleId: \$googleId){
      imageUrl
    }
  }
Querying data with the above query returns only the data needed to satisfy our widget. Incredible isn't it?
GraphQL is faster
Due to graphl flexibility in regards to retrieving specific fields when querying data, it results in it being faster than its counterpart REST.
Built-in state management mechanism
The plugin we'll use for graphql in our flutter app has a state management mechanism built-in, that we can use to update our UI based on the current state of the query.
Before implementing graphql let's set up other classes that would be helpful to us. Head to lib/presentation folder and create query_document_provider.dart file. The goal here is to inject our queries document down the widget tree to be accessible to children widgets using InheritedWidget.
Before implementing the QueriesDocumentProvider, it is important to understand what InheritedWidget is. It is a widget that propagates data down to the widget tree. It utilizes the BuildContext to achieve this.
BuildContext is a class in flutter that keeps track of "this" widget location in the widget tree. Each widget has its own BuildContext, but a widget BuildContext only keeps track of its direct parent BuildContext.
When you call Scaffold.of(context)or Navigator.of(context) flutter moves up the widget tree using the context finding the nearest Scaffold or Navigator widget, keep in mind that widget BuildContext has a Bottom-Up relationship with other widget's BuildContext.
import 'package:flutter/scheduler.dart';
import 'package:graphql_flutter/graphql_flutter.dart';
import 'package:music_mates_app/data/data_export.dart';


class QueriesDocumentProvider extends InheritedWidget {
  const QueriesDocumentProvider(
      {Key? key, required this.queries, required Widget child})
      : super(key: key, child: child);

  final MusicMateQueries queries;

  static MusicMateQueries of(BuildContext context) {
    final InheritedElement? element = context
        .getElementForInheritedWidgetOfExactType<QueriesDocumentProvider>();
    assert(element != null, 'No MusicMateQueries found in context');
    return (element!.widget as QueriesDocumentProvider).queries;
  }

  @override
  bool updateShouldNotify(QueriesDocumentProvider oldWidget) =>
      queries != oldWidget.queries;
}
We then add an extension on the BuildContext to provide our additional functionalities to the BuildContext class.
extension BuildContextExtension on BuildContext {

  /// Enables us to use context to access queries by doing [context.queries]
  MusicMateQueries get queries => AppProvider.of(this);

  /// Use context to show material banner by doing [context.showError()]
  void showError(ErrorModel error) {
    SchedulerBinding.instance?.addPostFrameCallback((timeStamp) {
      var theme = Theme.of(this);
      ScaffoldMessenger.of(this).showMaterialBanner(
        MaterialBanner(
          backgroundColor: theme.colorScheme.primary,
          contentTextStyle:
              theme.textTheme.headline5!.copyWith(color: Colors.white),
          content: Text(error.error),
          actions: [
            InkWell(
              onTap: () => ScaffoldMessenger.of(this).clearMaterialBanners(),
              child: const Icon(Icons.close, color: Colors.white),
            )
          ],
        ),
      );
    });
  }
}
Implementing GraphQL
To begin implementation of graphql in our flutter app, we need to add the graphql dependency for flutter, to do that, run this command on your terminal flutter pub add graphql_flutter.
In the main.dart file, change MyApp widget from a StatelessWidget to a StatefulWidget.
To connect our flutter app to the graphql server, we need to create GraphQLClient which requires a Link and GraphQLCache. The instance of GraphQLClient is passed to a ValueNotifier. It's also a good time to create an instance of MusicMateQueries.
The cache passed is what GraphQL uses to cache result,
GraphQLCacheby default usesInMemoryCachewhich does not persist to local storage. To persist cache to local storage, initialise theGraphQLCachestore parameter toHiveStorelike thisGraphQLCache(store: HiveStore());
  final GraphQLClient client = GraphQLClient(
    link: HttpLink('https://music-mates-fun.herokuapp.com/graphql'),
    cache: GraphQLCache(),
  );

  late final ValueNotifier<GraphQLClient> clientNotifier =
      ValueNotifier<GraphQLClient>(client);

  final queries = MusicMateQueries();
Next, wrap the MaterialApp with GraphQLProvider, this is important because using Query or Mutation widget requires a client, and this provider is responsible for passing an instance of GraphQLClient down the widget tree. Pass an instance of ValueNotifier<GraphQLClient> to GraphQLProvider so that when data changes, widgets can be notified of this.
Also, wrap the GraphQLProvider with our own QueriesDocumentProvider. The build() method will be updated to the code snippet below.
  @override
  Widget build(BuildContext context) {
    return QueriesDocumentProvider(
      entity: queries,
      child: GraphQLProvider(
        client: clientNotifier,
        child: MaterialApp(
          title: 'Music Mates',
          theme: _themeData(context),
          home: const GetStartedScreen(),
          routes: {
            Routes.home: (context) => const HomeScreen(),
            Routes.selectArtist: (context) => const SelectFavouriteArtist(),
          },
        ),
      ),
    );
  }
Add the line of code below to the BuildContextExtension extension, to easily access an instance of GrapQLClient by calling context.graphQLClient.
  /// Enables us to use context to access an instance of [GraphQLClient] by doing [context.graphQlClient]
  GraphQLClient get graphQlClient => GraphQLProvider.of(this).value;

  /// Take advantage of graphql cache, to cache the user's google Id
  /// to be used across app
  void cacheGoogleId(String googleId) {
    graphQlClient.cache.writeNormalized('AppData', {'googleId': googleId});
  }

  /// retrieves current user's google id from the cache
  String get retrieveGoogleId =>
      graphQlClient.cache.store.get('AppData')!['googleId'];
The docs state that using cache directly (
graphQLClient.cache) isn't ideal as changes won't be broadcasted immediately. Rather, prefer usingclient.writeQueryandclient.writeFragmentto those on theclient.cachefor automatic rebroadcasting. In my case, usingcachedirectly is more of a hack, to cache google id coming outside our database (it comes from the google sign-in package).
Performing CRUD operations with GraphQL
GraphQL uses the query keyword for read operations and the mutation keyword for create, update, delete operations.
Below is a flowchart of the app's process, to better understand what is expected of us.
Query
Firstly, go to lib/data/queries.dart file, under fetchAllArtist() return the query string below.
"""
    query {
      allArtists {
            id
            name
            imageUrl
            description
        }
    }
"""
We use the query keyword to signify that it's a query request. The allArtists is the root field and everything else that follows is the payload.
Add a fromJson constructor in the ArtistModel class, this will be responsible for parsing the artist json.
You can locate the
ArtistModelclass in this file path:lib/data/model/artist.dart
ArtistModel.fromJson(Map<String, dynamic> data)
  : name = data['name'],
    id = data['id'] == null ? null : int.parse(data['id']),
    imageUrl = data['imageUrl'],
    description = data['description'];
Since we'll be dealing with a list of artists, it makes sense to add another model class named ArtistList that will be responsible for parsing a list of artist json to a list of ArtistModel.
class ArtistList {
  final List<ArtistModel> artists;

  ArtistList.allArtistFromJson(Map<String, dynamic> json)
      : artists = json['allArtists']
            .list
            .map((e) => ArtistModel.fromJson(e))
            .toList();
}
In fetchUserInfo() return the string query below.
"""
   query UserInfo(\$googleId: String!){

    userInfo(googleId: \$googleId){
      name
      imageUrl
      favouriteArtists {
        name
        imageUrl
        description
      }
    }

    musicMates(googleId: \$googleId){
      name
      imageUrl
    }

  }
   """
The above is a query with variables. The UserInfo($googleId: String!) following the query keyword, defines a variable (which is needed by that query) and its data type to be used across the nested payloads.
The nested userInfo(googleId: $googleId) is the root field for fetching user's info, and then the googleId variable is passed along the query because the query requires it, the same thing applies to the musicMates field.
We have a glimpse of how the user json structure is, it's also a good time to add a fromJson() constructor in the UserModel class, responsible for parsing user json data to the model class.
You can locate the
UserModelclass in this file path:lib/data/model/user_model.dart
UserModel.fromJson(Map<String, dynamic> data)
  : name = data['name'],
    imageUrl = data['imageUrl'],
    favouriteArtist = data['favouriteArtists'] == null
        ? []
        : (data['favouriteArtists'] as List<dynamic>?)
            ?.map((e) => ArtistModel.fromJson(e))
            .toList();
Also, add a UserList model to parse list of users.
class UserList {
  final List<UserModel> users;

  UserList.musicMatesJson(Map<String, dynamic> data)
      : users = (data["musicMates"] as List)
            .map((e) => UserModel.fromJson(e))
            .toList();
}
Since the query on the home page fetches all data we need at once, we need to have a central model for our home screen. In the HomeModel class in lib/data/model/user_model.dart, update it with the code snippet below.
import 'package:music_mates_app/data/data_export.dart';

class HomeModel {
  final UserModel currentUser;
  final List<UserModel> musicMates;

  HomeModel.fromJson(Map<String, dynamic> json)
      : currentUser = UserModel.fromJson(json['userInfo']),
        musicMates = UserList.musicMatesJson(json).users;
}
You might notice that something is amiss in the string queries above, where are those root fields (userInfo and musicMates) coming from? Or are they just arbitrary field names? Well, recall from the onset of this article, it was mentioned that graphql is a contract/blueprint between the frontend and backend. So there must be a backend code.
The backend receives our request and resolves the query. Take a peep at the backend code for the queries below.

Note: I'm using Django with graphql for the backend due to my familiarity with python, you can use graphql technology with other backend technologies like Node.js. Also, the code might not be perfect, this is my first time writing backend code, so forgive any irregularities in the code above.
Next, head over to the lib/presentation/widgets folder, create a file named query_wrapper.dart, and insert the code below. The goal is to make a reusable widget we can use across our app to avoid duplication of code. Make sure to read the helpful comments in the code snippet below.
import 'package:flutter/material.dart';
import 'package:graphql_flutter/graphql_flutter.dart';
import 'package:music_mates_app/data/data_export.dart';
import 'package:music_mates_app/presentation/widgets/export.dart';

class QueryWrapper<T> extends StatelessWidget {

  const QueryWrapper({
    Key? key,
    required this.queryString,
    required this.contentBuilder,
    required this.dataParser,
    this.variables,
  }) : super(key: key);

  /// query parameters meant to be passed alongside query
  final Map<String, dynamic>? variables;

  /// The query string document to request from graphql endpoint
  final String queryString;

  /// This callback method is responsible for building our UI and passing the data
  final Widget Function(T data) contentBuilder;

  /// This callback receives the json data in a form of a map, and then
  /// parses the data to our model class.
  final T Function(Map<String, dynamic> data) dataParser;

  @override
  Widget build(BuildContext context) {
    return Query(
      options: QueryOptions(
        fetchPolicy: FetchPolicy.cacheAndNetwork,
        document: gql(queryString),
        variables: variables ?? const {},
        parserFn: dataParser,
      ),
      builder: (QueryResult result,
          {VoidCallback? refetch, FetchMore? fetchMore}) {
        if (result.isLoading) {
          return const LoadingSpinner();
        }

        if (result.hasException) {
          return AppErrorWidget(
            error: ErrorModel.fromString(
              result.exception.toString(),
            ),
          );
        }

        return contentBuilder(result.parserFn(result.data ?? {}));
      },
    );
  }
}
In the above code, we defined a generic parameter of type T for the widget. The generic parameter T is a placeholder for the type of data model we expect, read on for clarifications on this.
To harness the reactive nature of graphql queries with flutter, we use the Query<TParsed> widget which is a generic widget. It accepts two parameters; options and builder.
options
The options parameter is where configurations are set for "this" query call. It is an instance of the QueryOptions class, which accepts some parameters, particularly we will be setting fetchPolicy, document, parserFn, and variables parameters.
- The
documentparameter is where our query string will go, but it requires an instance ofDocumentNode. We will have to use thegql()which is provided by the graphql package and has the responsibility of parsing the string to aDocumentNode. > - The
variablesis aMap<String, dynamic>containing our query param, mapped to its value. > - The
parserFntakes the json data format and parses it to a model class of a specified type. > fetchPolicyparameter requires anenumof typeFetchPolicy. This dictates how fetching is done between cache and remote data. Below is an explanation of how each value affects the query process.FetchPolicy.cacheFirstprioritize cached data, and only fetches from remote when cached data isn't available. >FetchPolicy.cacheAndNetworkqueries for local data first, if available. Then fetches from remote data and returns it. >FetchPolicy.cacheOnlyas the name implies, fetches data from cached data and fails if no data is available. >FetchPolicy.noCachefetches remote data and ignores caching any data returned. >FetchPolicy.networkOnlyprioritize fetching from remote data, but still saves data to cache.
builder
The builder is a callback method that gets called when a query request is triggered, when the request is successful, and when the request fails. Its return type is a Widget.
The builder has three parameters:
result:- an instance ofQueryResultwhich has properties for the current state. >QueryResult.isLoadingis set to true when the request is still in progress. This is a good place to display a progress bar;QueryResult.hasExceptionis set to true, when an error occurs during processing request. >QueryResult.dataholds the response data returned by theGraphQLendpoint. It's of typeMap<String, dynamic>. >QueryResult.parseFnparses the data in json format to the specified model. >
refetchis a void callback method, that should be called to instruct the query to make a request to theGraphQLendpoint again. >fetchMorecallback can be utilized to handle the pagination of data.
To utilize QueryWrapper, replace the ListView in the SelectFavouriteArtist widget with the code below.
This widget can be found in
lib/presentation/select_favourite_artist.dart
QueryWrapper<ArtistList>(
  queryString: context.queries.fetchAllArtist(),
  dataParser: (json) => ArtistList.allArtistFromJson(json),
  contentBuilder: (data) {
    final list = data.artists;

    return ListView.builder(
      itemCount: list.length,
      physics: const BouncingScrollPhysics(),
      itemBuilder: (c, index) {
        var artist = list[index];
        return ItemSelectArtist(
          artist: artist,
          onTap: () => onTap(artist.id!),
          isSelected: selectedArtist.contains(artist.id),
        );
      },
    );
  },
)
Also, replace the _HomeScreenState scaffold body with the code below.
QueryWrapper<HomeModel>(
  queryString: context.queries.fetchUserInfo(),
  dataParser: (json) => HomeModel.fromJson(json),
  variables: {
    'googleId': context.retrieveGoogleId,
  },
  contentBuilder: (data) {
    return _Content(model: data);
  },
)
Mutation
The mutation keyword is used to signify that a request is to create, update, or delete data. Let us specify our mutation string in the lib/data/queries.dart file. Under createAccount() method, return the following string.
"""
  mutation createUser(\$name: String!, \$googleId: String!, \$imageUrl: String!, \$favouriteArtists: [ID]){
      createUser(name: \$name, googleId: \$googleId, imageUrl: \$imageUrl, favouriteArtists: \$favouriteArtists){
        user{
          name
          imageUrl
          favouriteArtists {
            name
            description
            imageUrl
          }
        }
      }
  }
  """
Under updateUser(), return the string code snippet below.
"""
    mutation UpdateUser(\$name: String, \$googleId: String!, \$imageUrl: String, \$favouriteArtists: [ID]){
        updateUser(name: \$name, googleId: \$googleId, imageUrl: \$imageUrl, favouriteArtists: \$favouriteArtists){
          user{
            name
            imageUrl
            favouriteArtists {
              name
              description
              imageUrl
            }
          }
        }
    }
    """
We can see that the mutation string is very similar to the query string. The only difference is their keyword, mutation uses the mutation keyword.
To see this in action, let's start by implementing creating a user. Head to lib/presentation/get_started_screen.dart file in _GetStartedScreenState state, wrap the GoogleButton with the code below.
Mutation(
  options: MutationOptions(
    document: gql(context.queries.createAccount()),
    onCompleted: (data) => _onCompleted(data, context),
  ),
  builder: (RunMutation runMutation, QueryResult? result) {
    if (result != null) {
      if (result.isLoading) {
        return const LoadingSpinner();
      }

      if (result.hasException) {
        context.showError(
          ErrorModel.fromGraphError(
            result.exception?.graphqlErrors ?? [],
          ),
        );
      }
    }

    return GoogleButton(
      onPressed: () => _googleButtonPressed(context, runMutation),
    );
  },
)
Below is the _onCompleted() method implementation.
 void _onCompleted(data, BuildContext context) {
    /// We get the user's favourite artist field from the data
    final favouriteArtists = data['createUser']['user']['favouriteArtists'];

    /// Check if the user has selected artists
    final bool hasSelectedArtist =
        favouriteArtists != null && favouriteArtists.isNotEmpty;

    /// If they do, move to home page. If not, take them to select artist page for them to select.
    Navigator.popAndPushNamed(
      context,
      hasSelectedArtist ? Routes.home : Routes.selectArtist,
    );
  }
Let's analyze the code. Similar to the Query widget, the Mutation widget takes in two parameters, options and builder.
options
The options parameter is where configurations are set for "this" mutation calls. It is an instance of the MutationOptions class, which has some similar parameters with QueryOptions and more, particularly we set document param which is mandatory, and the onCompleted callback method, that is called when a mutation request is done.
builder
The builder is a callback method that gets called when a mutation request is triggered, when the request is successful, and when the request fails. Its return type is a Widget.
It has two parameters runMutation accepts a Map<String, dynamic> parameter where you passed mutation query variables. It is an instance of RunMutation. On the other hand result contains the current state of the request (this was discussed in the query section). It is an instance of QueryResult.
Calling runMutation triggers the request. To see this in action, let us implement the _googleButtonPressed() method.
  Future<void> _googleButtonPressed(
      BuildContext context, RunMutation runMutation) async {

    /// Use the google signin package to intiate the google sign in
    final googleUser = await googleSignin.signIn();

    if (googleUser == null) return;

    /// cache the google id to be used across app
    context.cacheGoogleId(googleUser.id);

    /// Trigger the mutation query by calling the [runMutation] and passing in the mutation variable
    runMutation(
      {
        'name': googleUser.displayName,
        'googleId': googleUser.id,
        'imageUrl': googleUser.photoUrl!,
        'favouriteArtists': [],
      },
    );
  }
To see how to use mutation for update, head over to _DoneButton widget in lib/presentation/select_favourite_artist.dart, return the code below in the build() method.
Mutation(
  options: MutationOptions(
    document: gql(context.queries.updateUser()),
    onCompleted: (_) => Navigator.popAndPushNamed(context, Routes.home),
  ),
  builder: (RunMutation runMutation, QueryResult? result) {
    if (result!.isLoading) return const LoadingSpinner();

    if (result.hasException) {
      context.showError(ErrorModel.fromString(result.exception.toString()));
    }

    return Padding(
      padding: const EdgeInsets.symmetric(horizontal: 35),
      child: TextButton(
        style: ButtonStyle(
          enableFeedback: isEnabled,
          backgroundColor: MaterialStateProperty.all(
            Colors.grey[300],
          ),
        ),
        onPressed: () => _onButtonPressed(isEnabled, runMutation, context),
        child: SizedBox(
          width: double.infinity,
          child: Center(
            child: Opacity(
              opacity: isEnabled ? 1 : 0.2,
              child: const Text(
                "DONE",
                style: TextStyle(
                  fontSize: 16,
                  fontWeight: FontWeight.bold,
                ),
              ),
            ),
          ),
        ),
      ),
    );
  },
)
The method _onButtonPressed() implementation is below.
 void _onButtonPressed(
      bool isEnabled, RunMutation<dynamic> runMutation, BuildContext context) {
    if (isEnabled) {
      runMutation(
        {
          'googleId': context.retrieveGoogleId,
          'favouriteArtists': selectedArtist,
        },
      );
    } else {
      context.showError(
        ErrorModel.fromString("Please select favourite artist"),
      );
    }
  }
For updating the user favorite artist, we followed the same process for creating a user, so how does graphql know when to update or create data? You'll probably answer correctly, that the power lies in the backend doing all the resolving of queries and mutation requests. Take a peep at the backend code below.

Note: I'm using Django with graphql for the backend due to my familiarity with python, you can use graphql technology with other backend technologies like Node.js. Also, the code might not be perfect, this is my first time writing backend code, so forgive any irregularities in the code above.
Subscription
While our app, won't be needing to implement a subscription, it's very important to create awareness for this. Subscribing to a graphql endpoint means listening to changes, and reacting when a change occurs. To achieve this, it uses WebSockets and dart Stream.
Subscriptions use a similar format with a query, but this type uses subscription
as keyword. It uses the Subscription widget as opposed to the Query widget for the query.
To use a subscription, the link has to be a different link. But then, not all our requests are WebSocket links, how do we achieve this? We can do this by splitting the subscription-consuming link from the HttpLink.
link = Link.split((request) => request.isSubscription, websocketLink, link);
It accepts options an instance of SubscriptionOptions and the builder callback has a result parameter, which we've discussed already.
Wrap the child widget with ResultAccumulator which is a helper widget, provided by the graphql_flutter package to combine subscription results, without having you do the work yourself.
ResultAccumulator.appendUniqueEntries(
    latest: result.data,
    builder: (context, {results}) => ChildWidget(
      reviews: results.reversed.toList(),
    ),
  )
Continous Integration/Delivery with Codemagic (CI/CD)
CI/CD is a tool that automates deployment processes while the developer focuses on meeting up product requirements, quality of code.
Continuous Integration deals with building and testing applications when there's an update in the codebase.
Continuous Delivery automates the deployment or publishing of our app to various platforms like google play store, apple store, test flight, firebase e.t.c.
Codemagic is a CI/CD tool and works excellently with flutter, with some of its cool features highlighted below.
- Handles building both android (.apk/.aab) and IOS (.ipa) files.
- It's very easy to set up.
- It supports different git version control platforms like Github, Bitbucket, Gitlab.
- Works with a variety of triggers.
- Good error reporting when something went wrong during the build.
Codemagic set-up
Before setting up your app, you need to sign your android application.
Signin android application
Please note: if you already know how to sign in android application, you can skip the steps below
Android applications require two signing keys. Signing is a way of giving the app digital signatures. The first signing is required during upload to play store, here you'll use the upload key. The second is done after deployment, the deployment key will be used to sign the .apk/.aab file.
To generate an upload key, run the command below:
For Mac/Linux:
keytool -genkey -v -keystore ~/upload-keystore.jks -keyalg RSA -keysize 2048 -validity 10000 -alias myAliasKey
For Windows:
keytool -genkey -v -keystore c:\Users\USER_NAME\upload-keystore.jks -storetype JKS -keyalg RSA -keysize 2048 -validity 10000 -alias myAliasKey
The above command when run, requires you to input some information. Bear in mind that information like the store password and the key password would be needed. After you're done with that step, the command generates an upload-keystore.jks file on your home page.
You can decide to change the path to store the file, the
.jksfile name, and the alias key.
Under the android folder, create a file called key.properties, then insert the code below, replacing the <> with the actual value.
storePassword=<Store password>
keyPassword=<Key password>
keyAlias=<Alias key name>
storeFile=<Path to .jks file>
This file is a private file and SHOULD'NT be committed to your public source control. Search for
.gitignoreadd yourkey.propertiesfile, this tells git to ignore this file.
The next step is to utilize the upload key to sign the app. Head over to the /android/app/build.gradle file, insert the code below.
/// This loads the key.properties file
def keystoreProperties = new Properties()

def keystorePropertiesFile = rootProject.file('key.properties')
if (keystorePropertiesFile.exists()) {
    keystoreProperties.load(new FileInputStream(keystorePropertiesFile))
}
Search for "buildTypes" code block and replace with the code below:
signingConfigs {
    release {
        storeFile file(keystoreProperties['storeFile'])
        keyAlias keystoreProperties['keyAlias']
        keyPassword keystoreProperties['keyPassword']
        storePassword keystoreProperties['storePassword']
    }
  }

buildTypes {
    release {
        signingConfig signingConfigs.release
    }
}
The above code utilizes the key.properties file and anytime the app is run or is built on release mode, the upload key would be use to sign the app. IOS application sign in can be done automatically on codemagic.
To create a codemagic account visit https://codemagic.io/signup and then choose an option. Preferably sign-up with your version control platform where this application codebase is stored so that codemagic can easily pick it up.
You'll be prompted to add an application, you can either input the git URL of the project you want to set up or select a git provider so that codemagic can load your repository.
Select your repository, and select Flutter app for the project type.
Multiple workflows can be configured. Workflows come in handy when you have different release environments like production and development environments.
Build triggers setup
This aspect deals with setting up git actions that will trigger codemagic to start building your application. You have the option of triggering a codemagic build when push occurrs, pull request update, or tag creation. You can attach these triggers to a specific branch target.
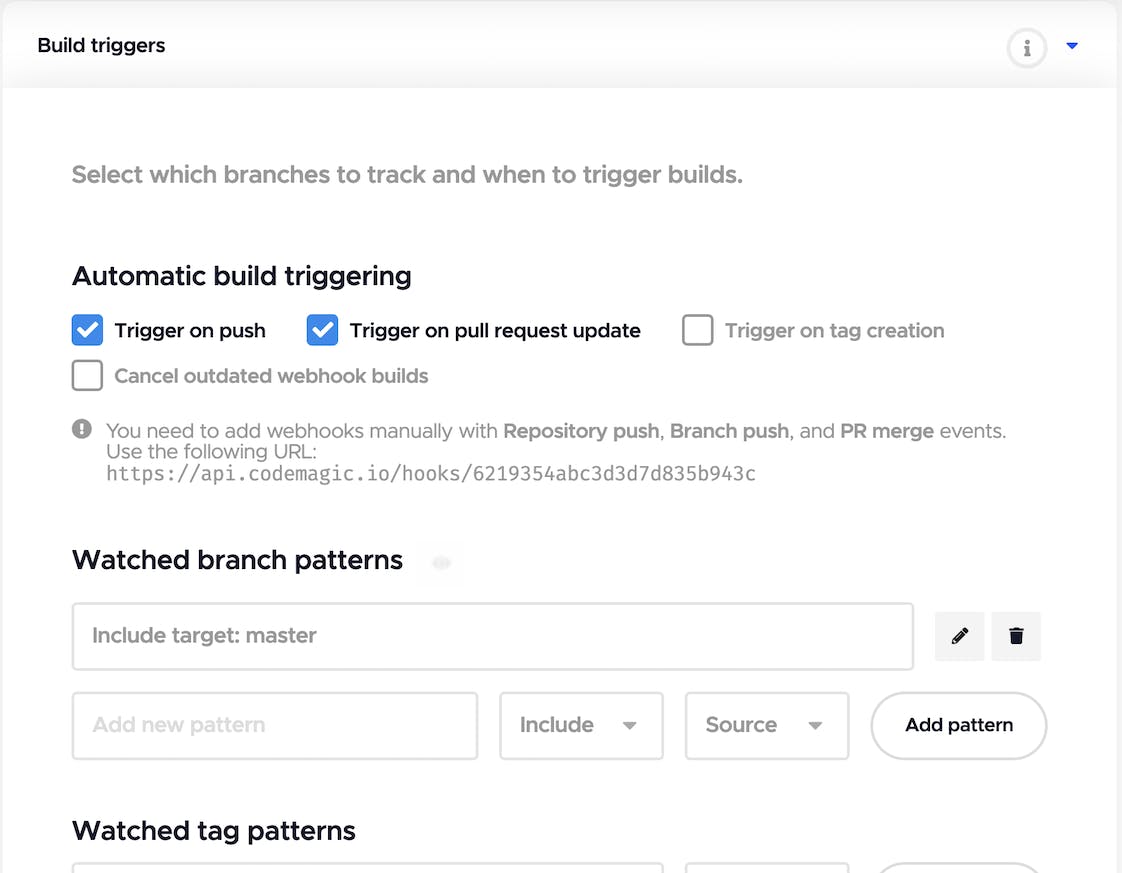
We want codemagic to trigger on push and pull requests and our target branch is the master branch
Test setup
To ensure that all test cases pass before publishing your app, ensure to enable codemagic running tests for each build by checking the Enable Flutter test field. You can also enable Static code analysis.
Build setup
Select Android App Bundle (AAB) as the android build format. The build mode should be in Release.
Build arguments are where you pass arguments to run along with the build command. For our case we want to app version to increment for each build so we set the build arguments for both ios and android as --build-name=1.0.$PROJECT_BUILD_NUMBER --build-number=$PROJECT_BUILD_NUMBER.
Distribution setup
Android code signing
Insert your upload signing configuration in the Android code signing tab. This includes the .jks file that was created, keystore password, key alias, and key password.
Google Play
In the Google play tab, check the Enable Google Play publishing checkbox. Select the internal track and check the Submit release as drafts, this build and upload to google play console as a draft, then we can manually release the app to internal testers, tap here to understand these each of these tracks.
The reason for selecting the internal track is because before releasing to production, you must have published an internal track application and answer series of questions about your application.
Take these steps to get the Credentials (.json). Note, you must have a google play account to proceed.
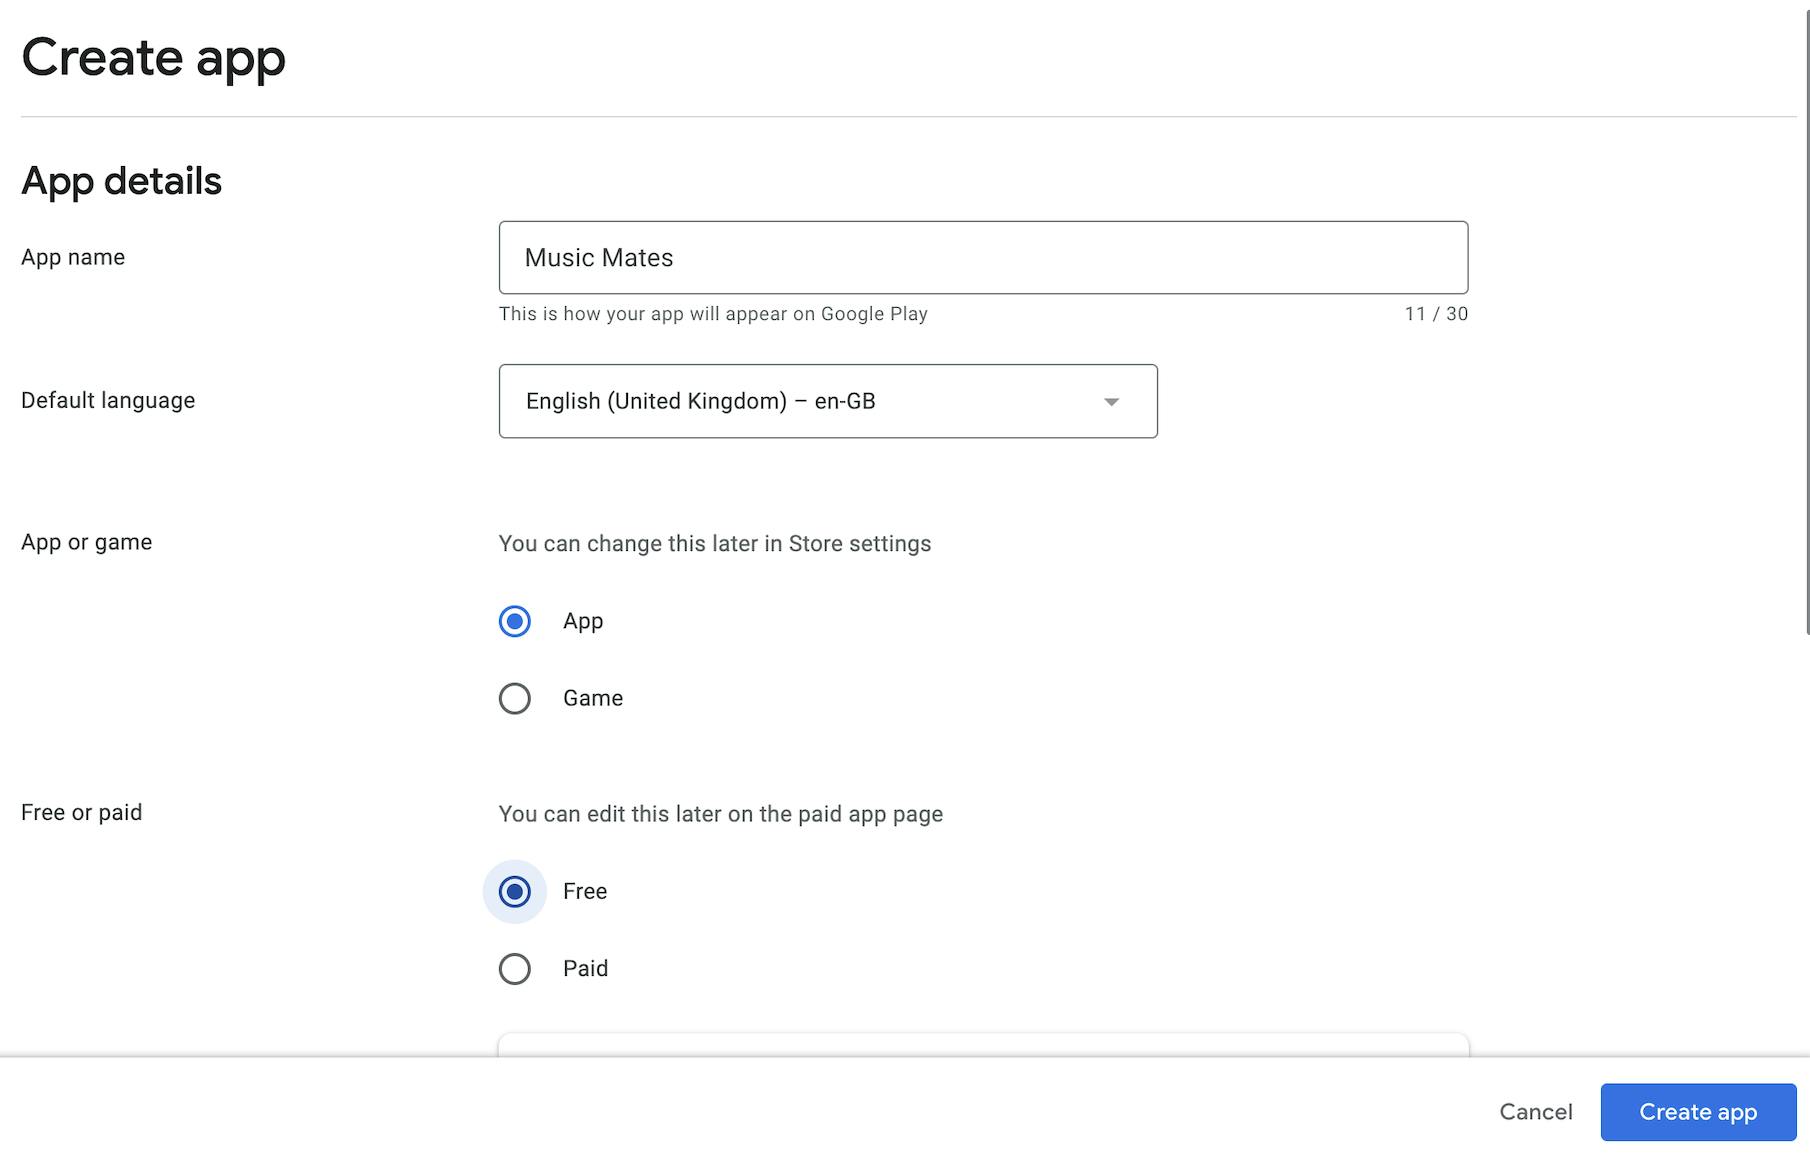
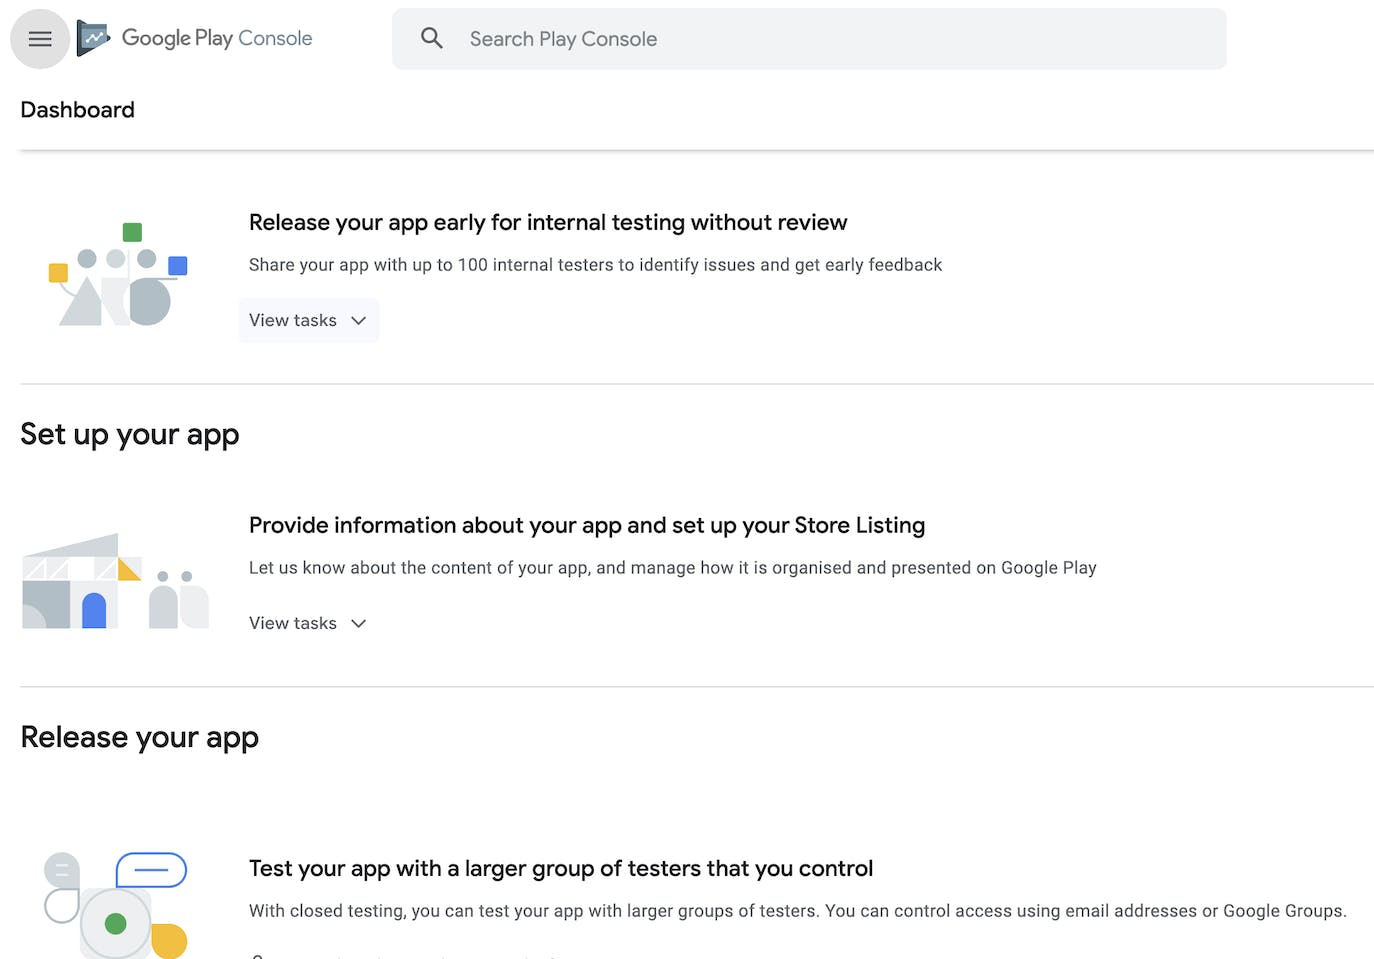
In Google Play Console
- Go to the Google Play Console, click on the Create app button.
- Click on the Api Access tab, search and click on the Create new service account button.
- On the dialog, tap on the Google Cloud Platform link.
In Google Cloud Platform
- Click on the menu, go to IAM & Admins > Service Accounts.
- Select a project, then select the Google Play Console Developer link on the dialog that pops up.
- Click Create service account.
From the documentation a Service Account credential is used to authenticate as a robot service account or to access resources on behalf of Google Workspace or Cloud Identity users through domain-wide delegation.
- Fill in the service account details, then click Create and continue
- Assign role to the service account.
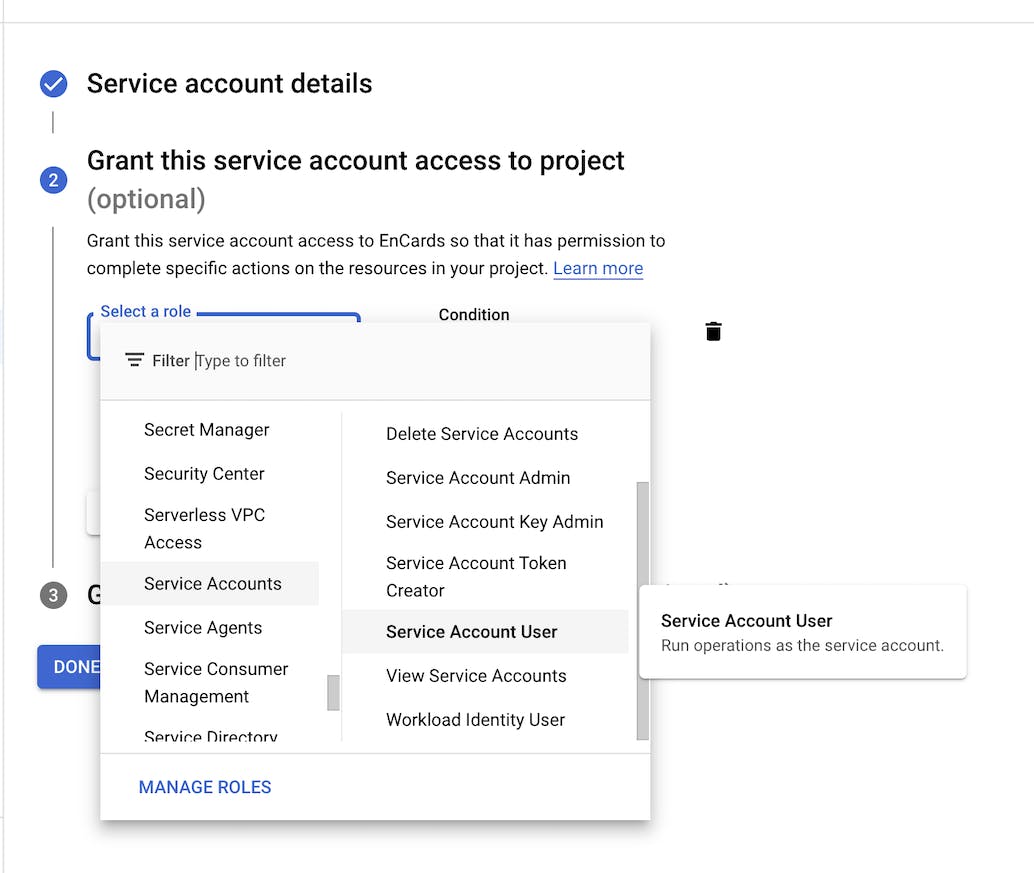
- Click Done.
Click on the service account just created. Should look like the image below

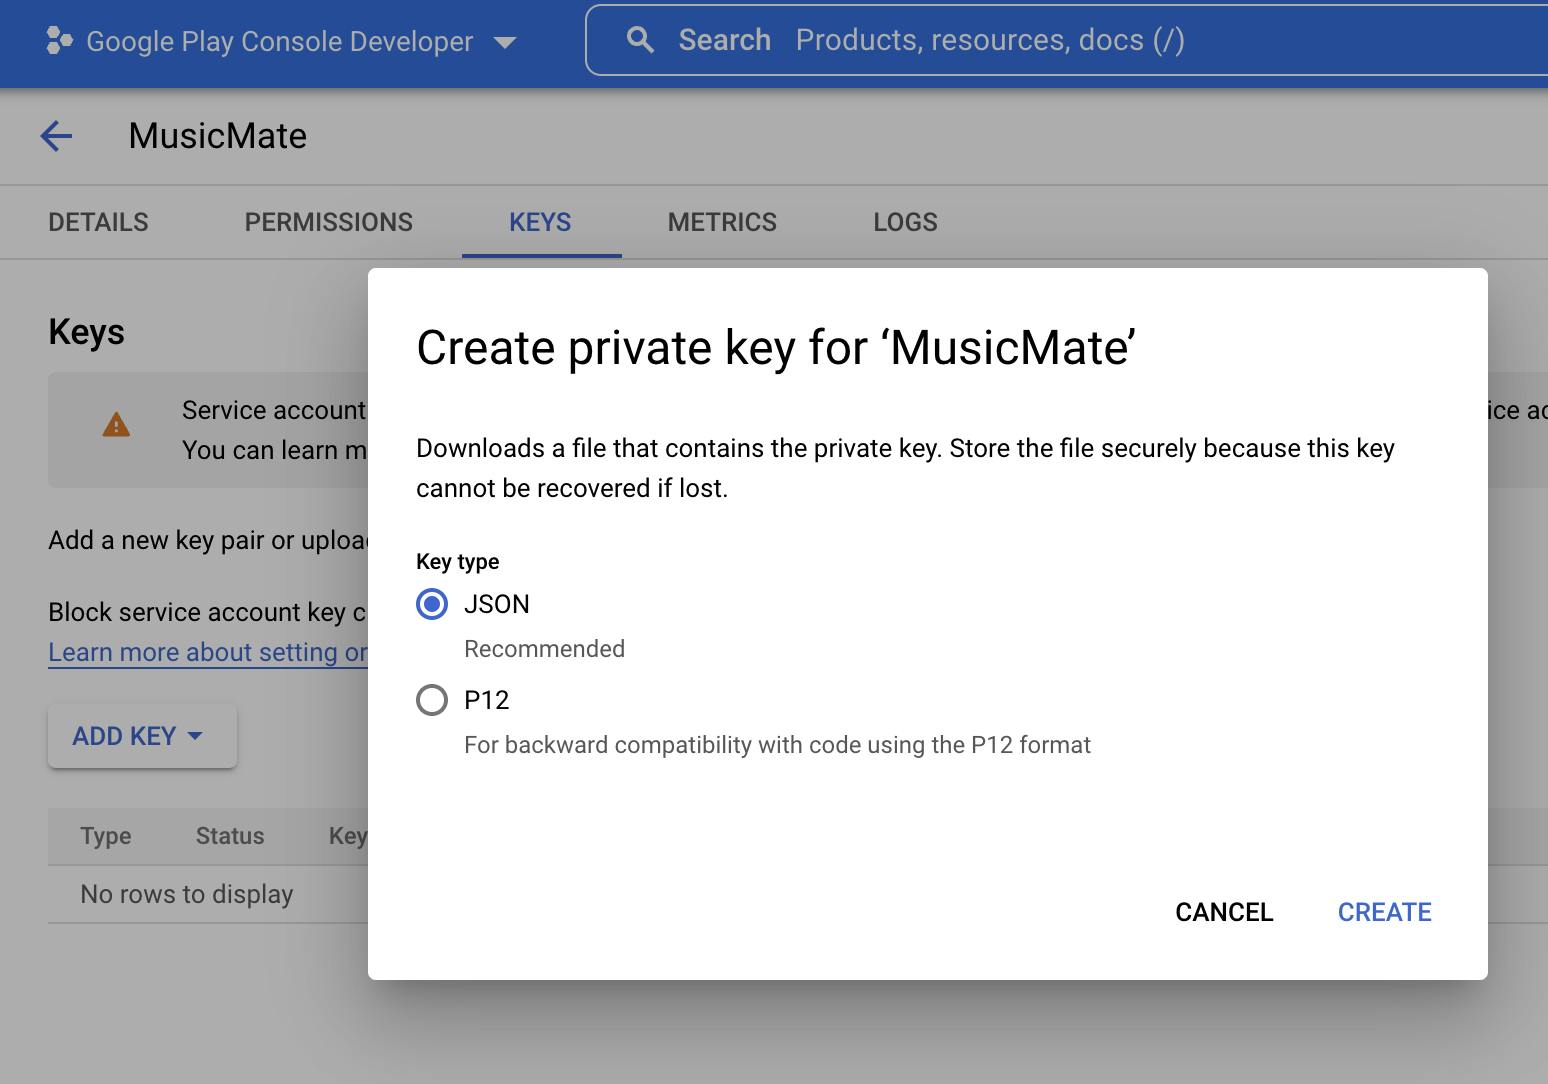
Click Keys > Add Keys > Create new key.
- You'll be prompted with a dialog below, select JSON, then click Create.
If you completed the above steps correctly, a .json file should be downloaded automatically. Then upload the .json file in the Credentials tab on codemagic portal. Make sure to save your changes.
In IOS code signing
To enable this section, you'll have to connect your apple developer portal.
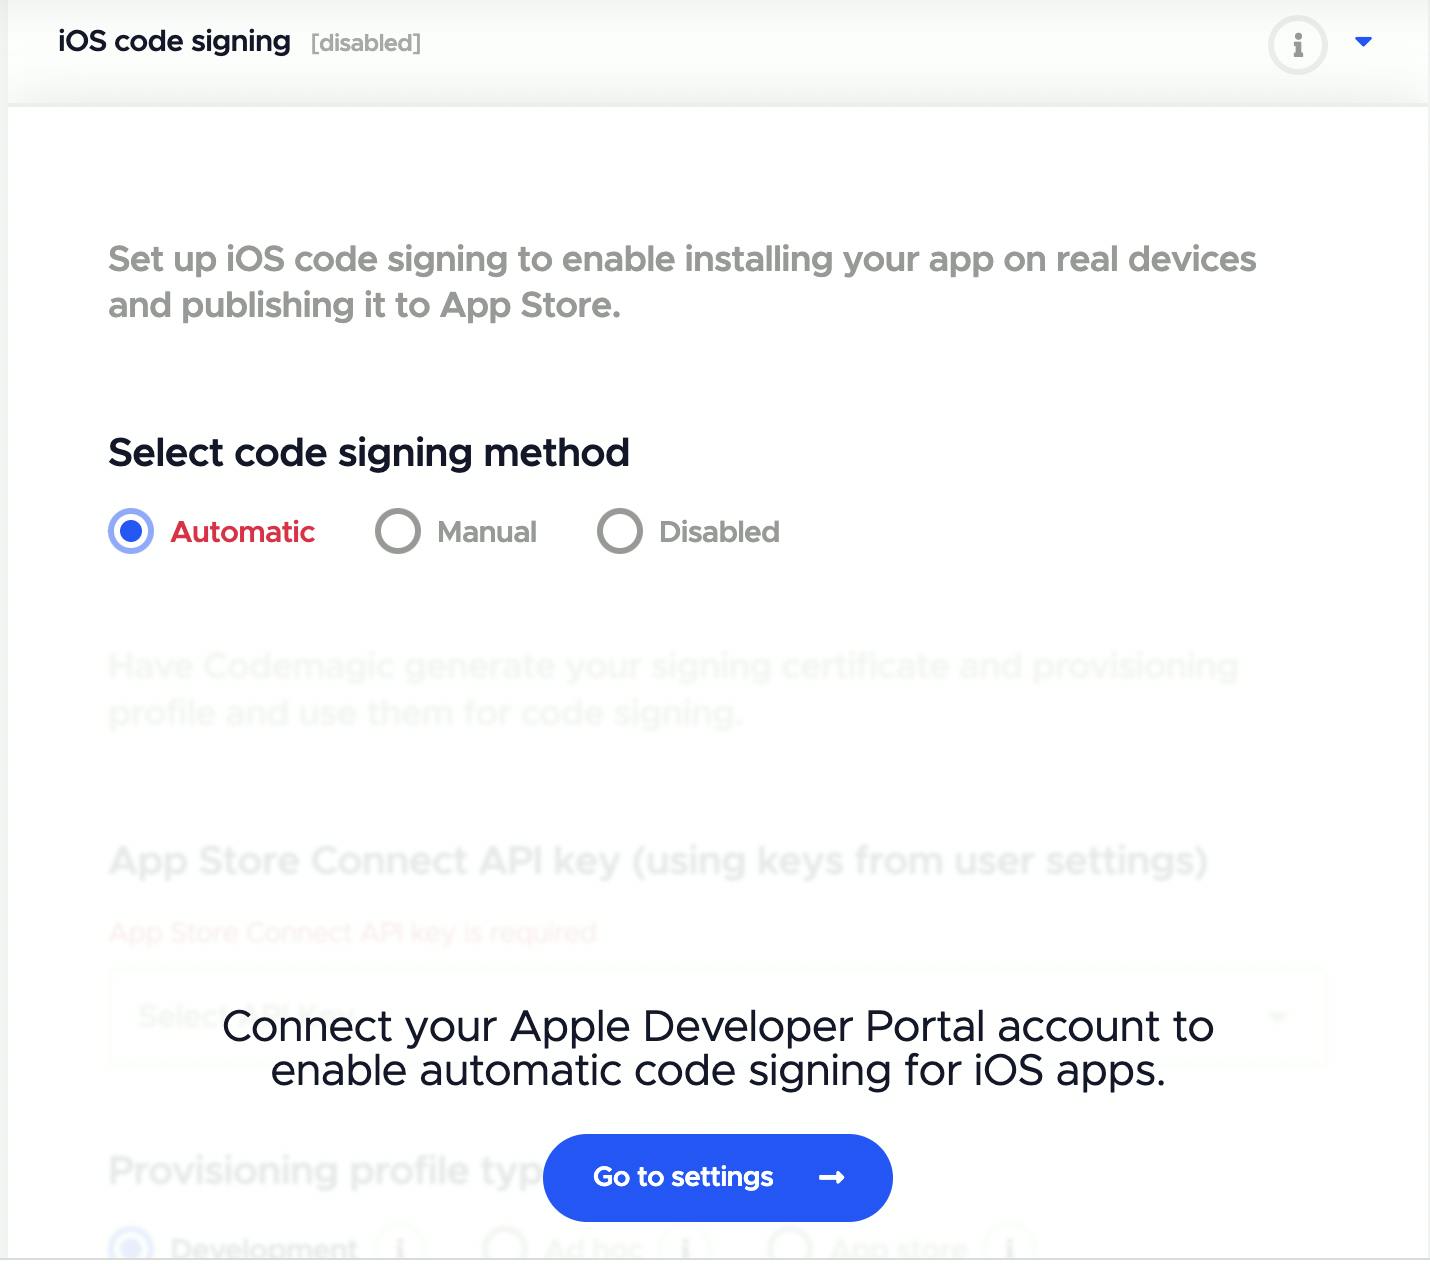 Tap on the Go to settings button and follow the instructions to connect your appstore account.
Head back to the Google Play Console on the API access tab, under Service accounts confirm that the service account you just created was added, then click on the Grant permissions, if you don't see the service account,refresh the page.

Under Permission, tap on the App permissions tab, click on the Add app dropdown, and select the google console app you created.
Right now, you can manually trigger a build by clicking on the Start new build button. Before triggering, ensure that:
- The kotlin version is equal to or above
1.6.0by heading to/android/build.gradleunderbuildScriptcode block. - For the first upload, ensure that artifacts have been uploaded manually at least once. If not a
404-Package not found errorwould be thrown by codemagic. - Each app version must be different from the previous app version.
To publish in the production track the same principles apply. But you have to complete a series of questions concerning your app on the google play dashboard.
At this stage we can only trigger the build manually, however, we can do the same automatically. The goal is to trigger codemagic to start build when there's a push to the master branch.
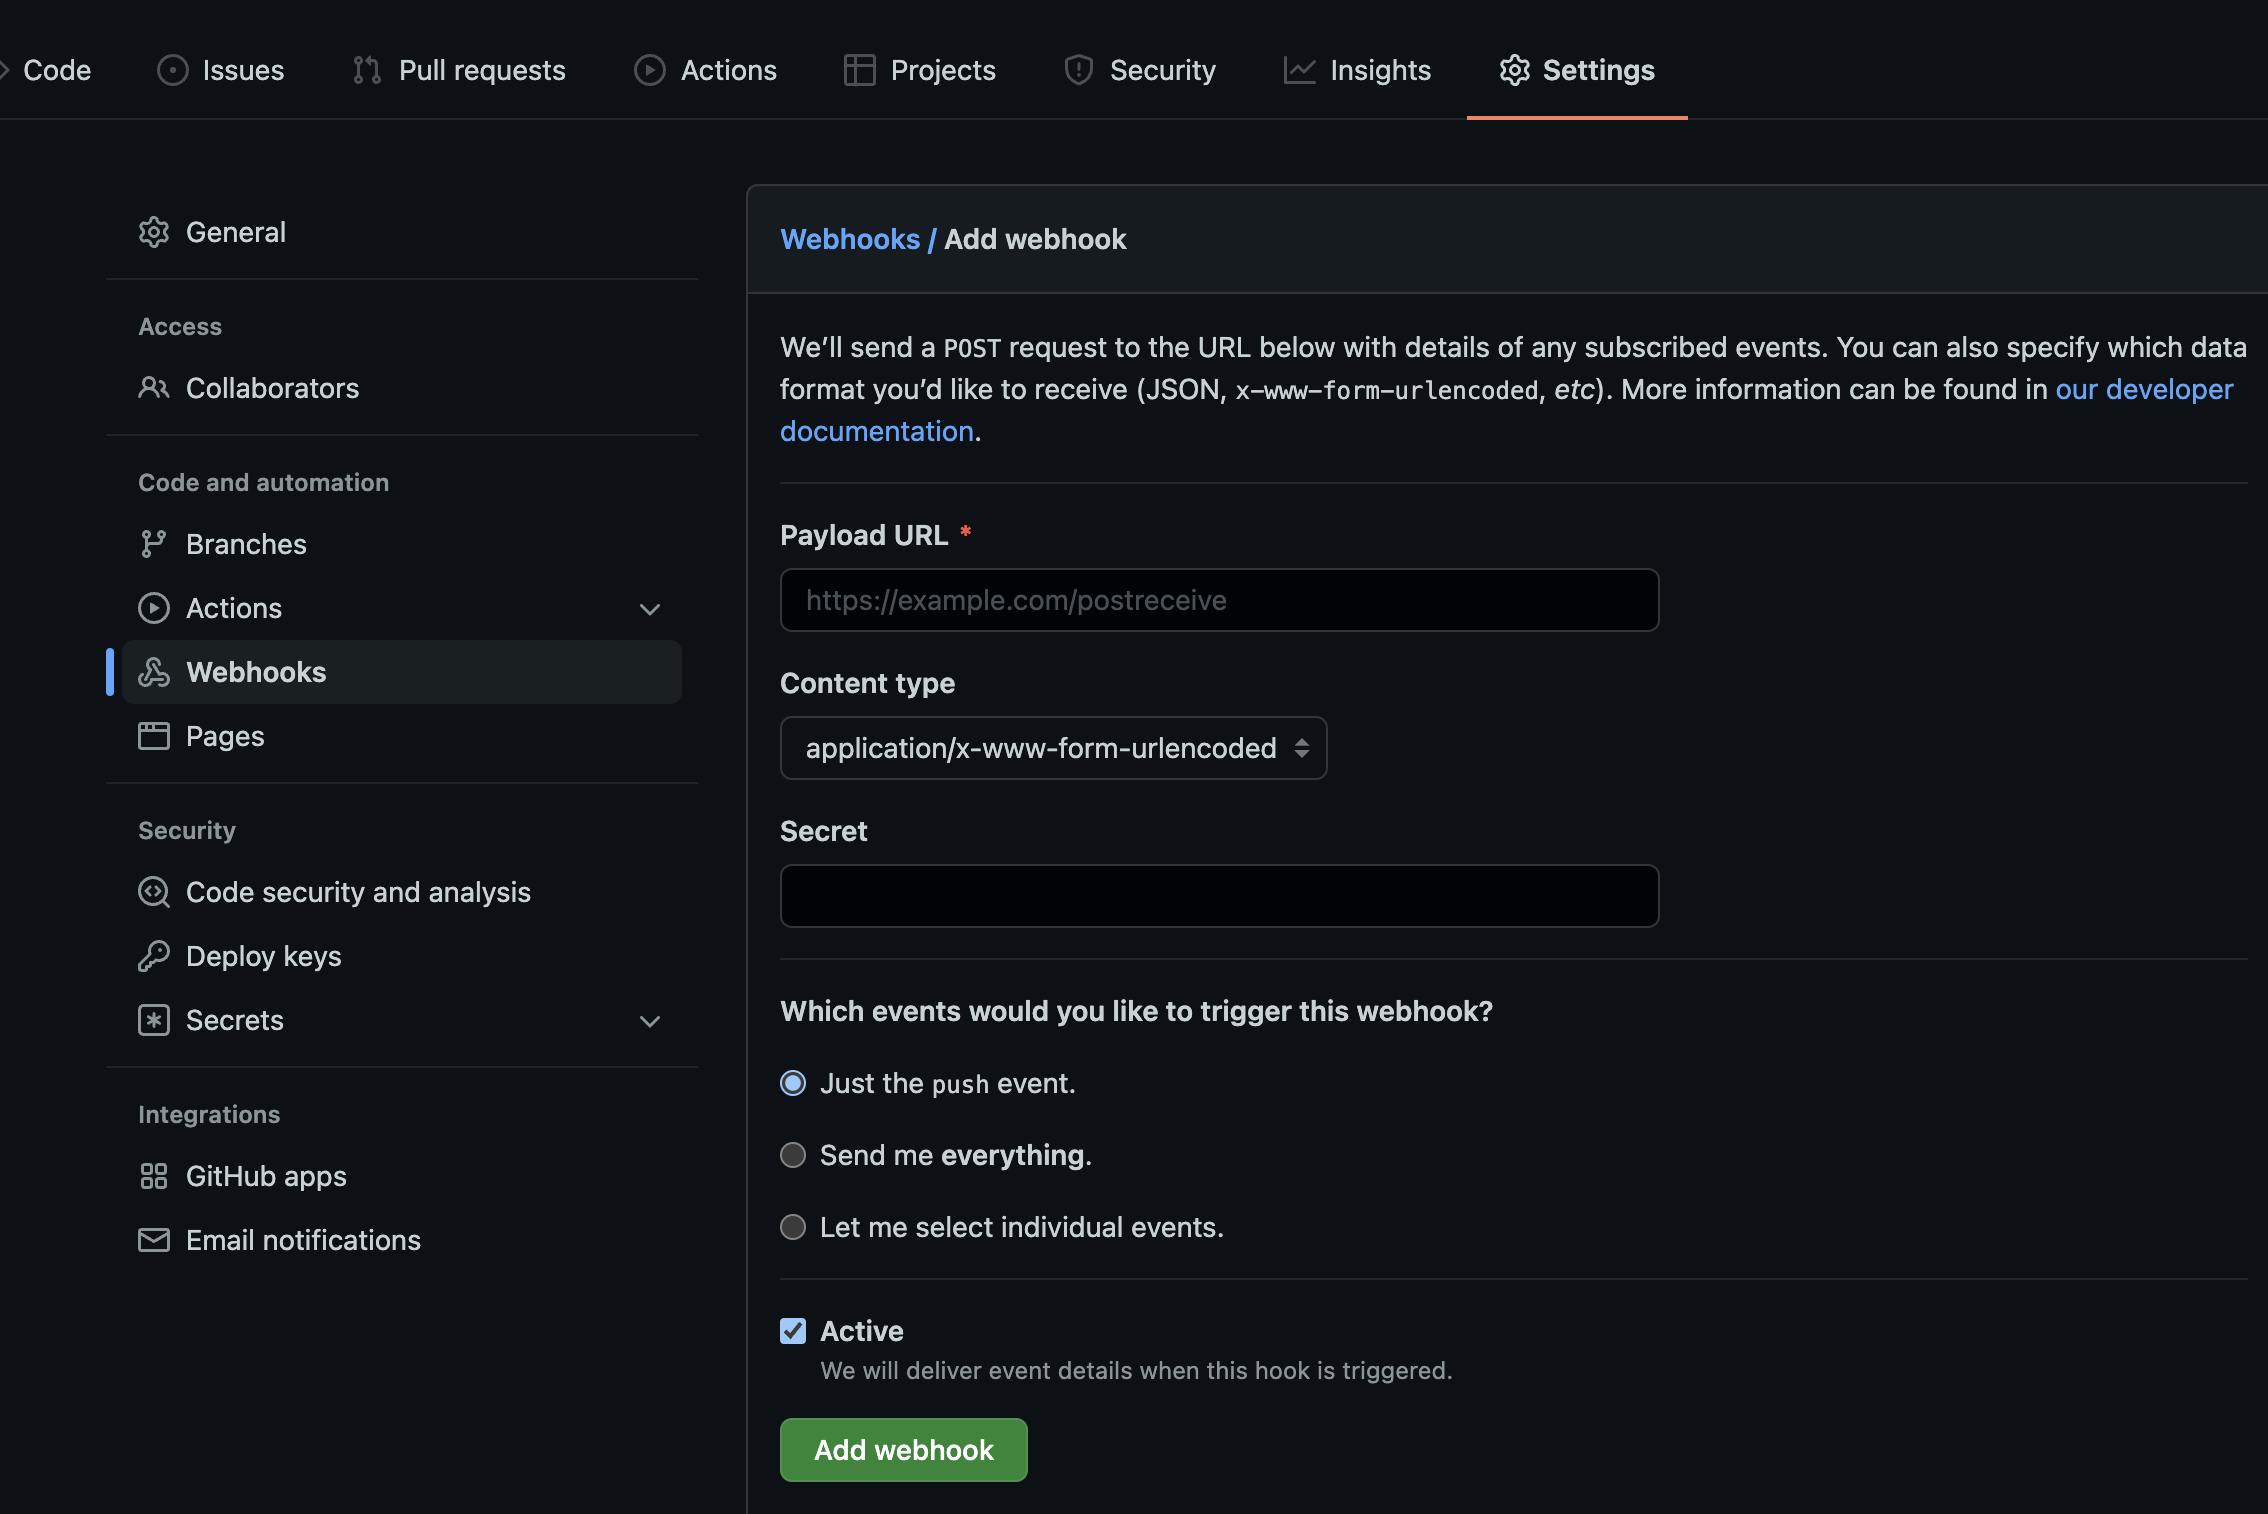
Webhooks allows you to send real-time data from one application to another in response to an event. In our codemagic app detail page, click on the tab named Webhooks. Copy the url shown there.
Head to your repository settings on Github. On the left panel, click Webhooks and insert the url you just copied to the Payload URL field. Then click the Add webhook button. Now anytime a push occurs on the master branch, codemagic triggers a build.
That was a lot to process!! This section focused on how to sign our apps, the why and benefits of CI/CD, how to use configure CI/CD with codemagic.
Conclusion
Hope you had fun building the Music Mates app? To see the completed code run git checkout master on your terminal. While this was probably a lot to take in, we've learnt much about graphql, what makes it powerful, how we can utilise graphql in flutter, and how to harness the reactive nature of flutter_graphql. We didn't stop there, we took our challenge two-steps the ladder by implementing continous integration/delivery, learning how to sign our applications and prepare for release. Hopefully, with this you have all you need to start building your applications with graphql and codemagic to handle your continous integration/delivery.